Engaging Introduction
Let me tell you about the potato recipe that made me feel like a genius.
I was hosting Thanksgiving for twelve people. The turkey was brining. The pies were chilling. The guest list kept growing. And I realized—with growing horror—that I had exactly zero burners left for mashed potatoes. No stovetop space. No oven space (the turkey had that locked down). No time to improvise.
I stood in my kitchen, defeated, staring at a bag of russet potatoes I had no way to cook.
Then I remembered a recipe I’d seen somewhere. Thinly sliced potatoes, stacked in a muffin tin, baked into little round towers. No stovetop required. Minimal oven space. And only a handful of ingredients.
I grabbed a mandoline, a block of Parmesan, and a stick of butter. Twenty minutes of slicing, stacking, and seasoning. Then into the oven they went—nestled next to the turkey, stealing its ambient heat.
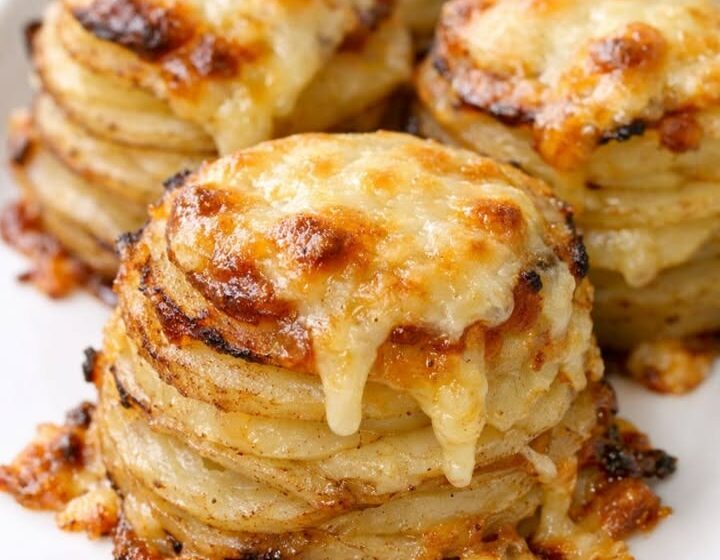
What came out of that oven was pure magic. Little golden potato stacks with frilly, crispy edges and tender, buttery centers. They looked like they came from a fancy restaurant. People couldn’t stop staring at them. Or eating them.
The best part? They use only four simple ingredients you probably already have on hand. This is the kind of practical, pass-it-down recipe our mothers and grandmothers would have loved—straightforward, reliable, and a guaranteed crowd-pleaser.
These potato stacks are right at home beside a baked ham, roast beef, or a simple roasted chicken. I like to serve them on a plain white platter so their golden, frilly edges can really shine. Add a green vegetable—steamed green beans, buttered peas, or a tossed salad—to balance the richness.
They also go nicely with meatloaf or grilled pork chops on a weeknight. If you’re setting out a holiday spread, tuck the platter of stacks near the rolls so folks can grab one in place of (or in addition to) bread.
Let me show you how to make these beauties.
Why These Cheesy Potato Stacks Will Become Your Secret Weapon
Let me be honest with you. I’ve made a lot of potato side dishes. Mashed potatoes (delicious, but they take up a burner). Roasted potatoes (great, but they need their own baking sheet). Scalloped potatoes (wonderful, but they require a full casserole dish and endless oven time).
These potato stacks are different.
4 ingredients – Potatoes, butter, cheese, salt. That’s it.
No stovetop required – All oven. Frees up burners for everything else.
Muffin tin magic – Individual portions, no cutting or scooping at the table.
Crispy edges, tender centers – The best of both potato worlds.
Make-ahead friendly – Reheat beautifully. Perfect for holiday hosting.
Looks fancy (but isn’t) – People will think you slaved. You didn’t.
Naturally gluten-free – No flour, no breadcrumbs. Just potatoes and cheese.
Ingredients – Short, Simple, Perfect
For the Potato Stacks:
2 lbs (900g) Russet or Yukon Gold potatoes (about 4-5 medium potatoes)
½ cup (1 stick / 113g) unsalted butter, melted
1 cup (100g) finely grated Parmesan cheese (freshly grated, not the green can)
1 teaspoon salt (plus more to taste)
½ teaspoon black pepper (optional)
Optional Add-Ins (Because You’ll Get Creative):
2 cloves garlic, minced (add to melted butter)
1 teaspoon fresh thyme or rosemary leaves (finely chopped)
½ teaspoon smoked paprika (for color and warmth)
¼ teaspoon cayenne pepper (for heat)
Substitutions & Swaps:
No Russet potatoes? Yukon Golds work beautifully (creamier, slightly less crisp). Red potatoes are too waxy (won’t soften properly). Avoid.
No Parmesan? Use pecorino Romano (saltier, sharper), Gruyère (nutty, melts beautifully), or cheddar (sharp, less “fancy” but delicious).
No butter? Use olive oil (different flavor, still good) or ghee (richer).
Dairy-free: Use vegan butter and a dairy-free Parmesan substitute (Violife, Follow Your Heart). The texture will be slightly different but still tasty.
Herb variations: Rosemary and thyme are classic. Sage is lovely with pork. Oregano works with Italian meals.
Step-by-Step – From Slicing to Stacks
Step 1: Preheat Your Oven
Preheat to 375°F (190°C) . Generously grease a 12-cup muffin tin with butter or nonstick spray. Do not skip this—potatoes love to stick.
Step 2: Slice the Potatoes Thin (This Matters)
Wash and peel the potatoes (peeling is optional—skins add texture and nutrients, but peeled stacks look more elegant). Using a mandoline or a very sharp knife, slice the potatoes into ⅛-inch thick rounds. Uniform thickness is essential for even cooking.
Pro tip: A mandoline is worth buying for this recipe alone. It takes 2 minutes to slice all the potatoes. Without one, go slowly with a sharp knife.
Do not rinse the slices. The natural starch helps the stacks hold together.
Step 3: Make the Butter Mixture
In a small bowl, combine the melted butter, minced garlic (if using), herbs, smoked paprika, or any other seasonings. Stir well.
Step 4: Toss the Potatoes
Place the potato slices in a large mixing bowl. Pour the melted butter mixture over them. Toss with your hands (or spatulas) until every slice is coated. The butter will pool at the bottom—that’s fine.
Sprinkle with salt and pepper. Toss again.
Step 5: Start Stacking
Take a potato slice and place it in the bottom of a muffin cup. Add another slice on top, rotated slightly so the edges don’t perfectly align (this creates the “frilly” look). Continue stacking until the cup is full—about 6-8 slices per stack, depending on thickness.
The goal: The stack should rise slightly above the rim of the muffin cup. They will shrink as they bake.
Pro tip: Use the largest slices for the bottom of the stack (helps hold shape). Use smaller slices for the top. Don’t overthink the arrangement—rustic is charming.
Step 6: Add the Cheese
Sprinkle about 1 tablespoon of grated Parmesan over each stack. Don’t press it in—let it rest on top. Some cheese will fall between the slices. That’s good. That’s the secret to cheesy pockets throughout.
Step 7: Bake
Place the muffin tin on the middle rack of your preheated oven. Bake for 25-30 minutes, until the potatoes are tender when pierced with a knife and the edges are golden brown and frilly.
Check at 25 minutes: The tops should be browned and slightly crisp. If they’re pale, bake another 5-10 minutes.
Step 8: Rest (Crucial Step!)
Remove the muffin tin from the oven. Let the potato stacks rest in the pan for 5-10 minutes. This allows them to set and release from the pan naturally.
Do not skip this. If you try to remove them immediately, they will fall apart.
Step 9: Release and Serve
Run a thin knife or offset spatula around the edge of each stack to loosen it. Gently lift the stacks out of the tin. They should hold their shape beautifully.
Serve warm, on a platter, frilly edges up. Watch them disappear.
My Best Tips for Stack Success
Slice evenly. Uneven slices = uneven cooking. Thick slices stay raw in the middle. Thin slices burn. A mandoline is your best friend.
Don’t rinse the potatoes. The natural starch acts as glue, holding the stacks together. Rinsing removes that starch.
Generously grease the muffin tin. Potatoes love to stick. Use butter, not spray (butter has better flavor and release). If you’re worried, use parchment paper circles in the bottom of each cup.
Salt in layers. Salting the butter mixture is good. Salting the tossed slices is good. Don’t overdo it—Parmesan is salty.
Parmesan on top (and between). Don’t just sprinkle on top. Let cheese fall between layers. It melts into crispy, lacy edges that are the best part.
Let them rest before removing. Five minutes minimum. Ten is better. They will release more easily and hold their shape.
Use a thin spatula. A fish spatula or offset spatula works perfectly. Slide it under the stack and lift gently.
The Science: Why These Work (Optional but Interesting)
Potatoes are mostly water and starch. When you slice them thin and bake them with fat (butter) and salt, several things happen:
The starch gelatinizes: Heat causes the starch granules in the potatoes to absorb water and swell, creating a tender, cohesive interior.
The edges dehydrate and crisp: The exposed edges lose moisture faster than the center, creating that frilly, crispy texture.
Cheese melts and browns: Parmesan contains little water and lots of protein and fat. It melts into lacy, crispy edges that add flavor and structural support.
The stack holds together: The combination of starch “glue,” melting cheese, and the stacking method creates a self-supporting tower that doesn’t collapse.
That’s the science. But all you need to know is: they’re delicious.
Fun Variations (Once You’ve Mastered the Original)
Garlic Herb Potato Stacks – Add 2 minced garlic cloves and 1 tablespoon fresh chopped rosemary to the melted butter. Use the same amount of Parmesan. Tastes like a fancy steakhouse side.
Smoked Gouda & Bacon Stacks – Replace Parmesan with smoked Gouda (grated). Add ¼ cup crumbled cooked bacon to the cheese mixture, sprinkling between layers. Serve with sour cream.
Spicy Chipotle Stacks – Add 1 teaspoon chipotle powder and ½ teaspoon smoked paprika to the butter. Use a sharp cheddar instead of Parmesan. Serve with grilled steak.
Truffle Parmesan Stacks – Add 1 teaspoon truffle oil to the melted butter (reduce regular butter by 1 tablespoon). Use Parmesan as written. Fancy enough for a date night.
Cheddar & Chive Stacks (Kid-Friendly) – Replace Parmesan with sharp cheddar. Add 2 tablespoons fresh chopped chives to the butter mixture. Serve with anything.
Pesto Potato Stacks – Replace half the melted butter with 2 tablespoons basil pesto. Use Parmesan as written. Italian night perfection.
What to Serve with Cheesy Potato Stacks
These stacks are versatile. Here’s where they shine.
Holiday meals:
Thanksgiving turkey
Christmas ham
Easter lamb
Prime rib
Weeknight dinners:
Meatloaf
Grilled pork chops
Roasted chicken
Salmon or halibut
Vegetarian mains:
Mushroom Wellington
Lentil loaf
Eggplant Parmesan
Quiche or frittata
Brunch:
Alongside eggs Benedict
With a simple green salad
Next to a quiche
The ultimate move: Serve them as an appetizer. Small stacks (using mini muffin tins) with a dollop of sour cream and chives. People lose their minds.
How to Store, Reheat, and Make Ahead
Refrigerator: Store cooled potato stacks in an airtight container for up to 4 days. They will soften but remain delicious.
Reheating (oven – best method): Place stacks on a baking sheet. Reheat at 375°F for 5-7 minutes, until edges crisp again.
Reheating (air fryer): 375°F for 3-4 minutes. This restores the crisp edges beautifully.
Reheating (microwave): 30-60 seconds. The edges will be soft, not crisp. Fine for leftovers but not ideal.
Freezer: Not recommended. Potatoes become grainy when frozen and thawed. Make fresh.
Make ahead for parties: Assemble the stacks in the muffin tin. Cover tightly with plastic wrap and refrigerate for up to 24 hours. When ready to bake, add 5-10 minutes to the bake time (starting from cold). Or bake fully, cool, refrigerate, and reheat before serving.
Frequently Asked Questions
Can I use a different type of potato?
Yukon Golds work beautifully (creamier, slightly less crisp). Russets are best (crispier edges). Red potatoes are too waxy—they won’t soften properly and will remain crunchy. Avoid.
Why are my potato stacks falling apart?
Two culprits: you tried to remove them too soon (let them rest 5-10 minutes), or your slices were too thick (need a thinner, more flexible stack). Next time, use a mandoline and be patient.
Can I make these in a regular baking dish instead of a muffin tin?
Yes, but they won’t be individual stacks. Arrange slices in an overlapping pattern in a buttered dish. Bake as directed. You’ll have a potato “torte” that you cut into wedges. Still delicious, less fancy.
My stacks are burnt on the edges but raw in the middle. What happened?
Your slices were too thick. Thick slices take longer to cook through, but the exposed edges burn. Use a mandoline. ⅛ inch is perfect.
Can I double this recipe?
Yes. Use two muffin tins. Rotate them halfway through baking (swap top and bottom racks). Bake time may increase by 5 minutes.
Are these keto-friendly?
Potatoes are not keto (high carb). If you’re keto, this recipe isn’t for you. For low-carb guests, offer an alternative vegetable.
Can I add meat to the stacks?
You can, but it changes the cooking time. If you want bacon or ham, crumble cooked meat between layers. Do not add raw meat—it won’t cook through in time.
A Warm, Encouraging Conclusion
Here’s what I love most about these Cheesy Potato Stacks.
They solve problems. No stovetop space? No problem. Need an impressive holiday side? No problem. Want something that looks fancy but takes almost no skill? No problem.
I’ve made these for Thanksgiving, Christmas, Easter, and random Tuesday nights when I wanted something special. Every single time, people ask for the recipe. Every single time, the platter comes back empty.
And when I tell them it’s just potatoes, butter, cheese, and salt? They don’t believe me at first. Then they try them. Then they believe.
Now it’s your turn.
Did you make these potato stacks? I genuinely want to know. Did you use a mandoline or a knife? Add garlic and herbs? Burn the edges because you got distracted? (I’ve done that too.) Drop a comment below – your wins and your “oops” moments make this community so much better.
And if this recipe earns a spot at your holiday table (or your Tuesday night dinner), please share it with a friend who loves easy, impressive side dishes. A text, a pin, a shared link. Good recipes are meant to be passed down.
Now go slice those potatoes. Your stacks are waiting. 🥔🧀✨