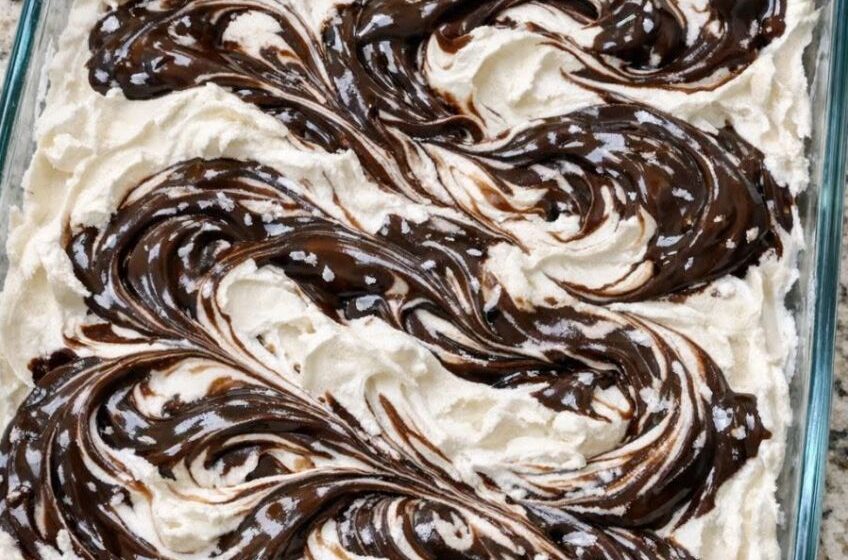
This 3-ingredient ice cream sandwich bar recipe is straight from my Grandma Shirley’s Midwestern backyard playbook—the one she swore would steal the show at any barbecue. It’s almost embarrassingly simple: vanilla ice cream sandwiches, a billowy layer of whipped topping, and thick ribbons of chocolate fudge sauce. No baking, no fancy equipment, just a glass casserole dish and a bit of freezer space.Ice cream sandwich bars in a glass dish with chocolate swirls
The result looks like something from an old church potluck table: creamy white layers with dramatic dark chocolate swirls, and it disappears just as fast. It’s a practical, make-ahead dessert that’s ideal when you’re feeding a crowd and want something nostalgic, cold, and guaranteed to vanish in minutes.
Serve these ice cream sandwich bars straight from the freezer, cut into squares with a sharp knife run under warm water for cleaner slices. They’re perfect after anything off the grill—burgers, brats, ribs, or grilled chicken—because the cold, creamy layers contrast beautifully with smoky, salty mains. Pair with fresh summer fruit like sliced strawberries or a simple bowl of cherries to brighten the plate. Coffee or iced cold brew is a surprisingly good match with the chocolate fudge, and for a cookout, a light lager or a not-too-sweet hard cider balances the richness nicely.Cut ice cream sandwich bar served with strawberries
3-Ingredient Ice Cream Sandwich Bars
Servings: 12
Ingredients
12 vanilla ice cream sandwiches, unwrapped
1 (8-ounce) tub frozen whipped topping, thawed
1 cup thick chocolate fudge sauce, room temperature
Directions
Line a 9×13-inch glass casserole dish with a very light mist of nonstick spray or a thin smear of neutral oil, then wipe out the excess with a paper towel. This helps the bars release without adding flavor.
Arrange half of the vanilla ice cream sandwiches in a single layer on the bottom of the dish, placing them snugly side by side. You may need to cut one sandwich in half to fill any gaps so the bottom is mostly covered.Ice cream sandwiches arranged in a glass baking dish
Spread half of the whipped topping evenly over the ice cream sandwiches, using an offset spatula or the back of a spoon to reach all the corners and create a smooth, creamy layer.
Drizzle about half of the chocolate fudge sauce over the whipped topping in thin ribbons. Use a butter knife or skewer to gently swirl the fudge into the whipped topping, creating visible marbled streaks without fully mixing the layers together.Chocolate fudge being swirled into whipped topping
Repeat the layering: add the remaining ice cream sandwiches in a single layer over the swirled topping, pressing them gently so they sit evenly.
Spread the remaining whipped topping over the second layer of sandwiches, smoothing the surface. Drizzle the rest of the chocolate fudge sauce over the top and swirl again lightly for a bold marbled effect that will show through the glass sides.
Cover the dish tightly with plastic wrap or a lid and freeze for at least 4 hours, or until the bars are firm enough to slice cleanly. For the most defined layers, overnight freezing is ideal.Finished dessert ready to freeze with swirled chocolate top
When ready to serve, remove the dish from the freezer and let it sit at room temperature for 5 to 10 minutes to soften slightly. Run a sharp knife under warm water, wipe it dry, and cut the dessert into 12 bars or squares. Return any leftovers to the freezer promptly to keep the layers intact.
Variations & Tips
For a chocolate-vanilla contrast, swap half of the vanilla ice cream sandwiches for chocolate-coated ones, keeping the total number the same. Add a bit of texture by sprinkling crushed chocolate cookies, graham crackers, or chopped peanuts between the layers before you add the whipped topping. If you like a mocha note, whisk 1 to 2 teaspoons of instant espresso powder into the fudge sauce before drizzling and swirling.Ingredient variations for ice cream sandwich bars
For a slightly lighter version, use a light whipped topping; just note that it may soften a bit faster at room temperature. If you need to make this ahead for a party, assemble up to 2 days in advance, cover well, and freeze; the texture actually improves as everything settles and firms up.
Food safety tips: Keep the whipped topping refrigerated until you’re ready to assemble, and don’t leave the finished dessert out of the freezer for more than 30 minutes at a time to avoid melting and potential bacterial growth. Refreeze promptly after serving, and discard any portions that have sat out long enough to become very soft or liquidy. When cutting and serving, use clean utensils and avoid repeatedly dipping a used knife into the pan without wiping, to keep the top looking neat and to minimize cross-contamination.