The Ultimate Southern Church Cake (A Potluck Classic Perfected!)
There is a profound culinary sociology behind the classic 9×13 potluck dessert. Often referred to simply as “Church Cake,” this category of dessert is engineered specifically for large gatherings: it must be easy to transport, simple to serve in clean squares, and universally crowd-pleasing. But beyond its convenience, a truly spectacular Church Cake relies on a brilliant sequence of moisture migration and structural layering.
When you are tasked with bringing a dessert to a weekend barbecue or a family reunion, you need a recipe that delivers maximum flavor without keeping you tethered to a stand mixer all afternoon. This specific recipe utilizes a highly effective, smart shortcut—a base made from a banana muffin mix—which provides a dense, robust crumb structure capable of supporting heavy layers of crushed pineapple, stabilized cream cheese, and airy whipped topping.
As this cake rests in the refrigerator, the layers undergo a process of flavor melding, resulting in a light, creamy, and comforting dessert that tastes like it took hours to construct. Let’s head into the test kitchen and break down the mechanics of this legendary, crowd-pleasing classic!
The Culinary Science: Why This Layered Cake Works
- The Structural Sponge: Standard cake mixes are often too light and airy, causing them to collapse under heavy dairy toppings. By utilizing a banana muffin mix, you are baking a denser, structurally sound foundation with a tighter crumb that won’t turn to mush when introduced to the fruit layer.
- Controlled Moisture Migration: Crushed pineapple provides a vibrant, sweet acidity that cuts through the rich dairy. However, properly draining it is essential. The small amount of residual moisture gently hydrates the top of the banana cake, while preventing the entire dish from becoming waterlogged.
- Dairy Emulsification & Stabilization: Beating softened cream cheese into an instant vanilla pudding base is a brilliant structural hack. The modified food starches in the instant pudding actively stabilize the fat and moisture in the cream cheese, creating a thick, velvety layer that holds a perfectly clean edge when sliced.
The Ingredient Formula
To construct this flawless, multi-layered dessert, you will need the following components:
The Cake Foundation:
- 2 (7 oz) boxes Jiffy banana muffin mix
- 2 large eggs
- ⅔ cup whole milk
The Cream & Fruit Layers:
- 1 (20 oz) can crushed pineapple, thoroughly drained
- 1 (8 oz) package cream cheese, softened to room temperature
- 1 (6 oz) box instant vanilla pudding mix
- 3 cups cold milk
- 1 (16 oz) container whipped topping (like Cool Whip), thawed
Technical Execution & Assembly
Step 1: Bake the Foundation Preheat your oven to 350°F (175°C). Thoroughly grease a 9×13-inch glass or ceramic baking dish. In a large mixing bowl, whisk together the banana muffin mix, eggs, and ⅔ cup of milk until just combined (do not overmix, or the gluten will develop and make the cake tough). Spread the batter evenly into the prepared dish and bake for 25–30 minutes, or until lightly golden and a toothpick inserted into the center comes out completely clean. Let the cake cool completely to room temperature.
Step 2: Prepare the Cream Layer In a medium bowl, use a hand mixer to beat the room-temperature cream cheese until it is completely smooth and free of lumps. In a separate, large bowl, briskly whisk the instant vanilla pudding mix with the 3 cups of cold milk until it begins to thicken (about 2 minutes). Fold the thickened pudding into the smooth cream cheese, mixing until the emulsion is uniform and velvety.
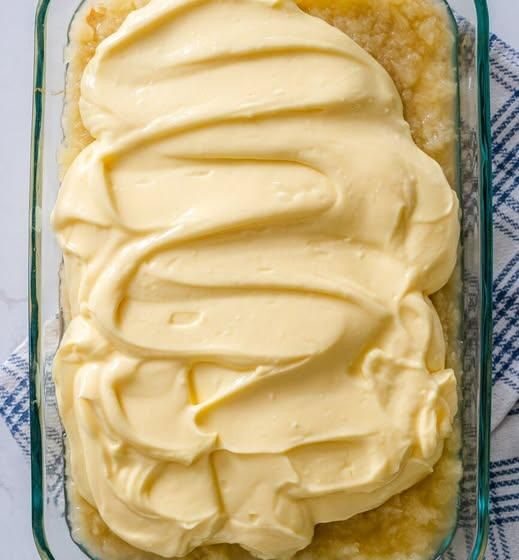
Step 3: The Architecture of the Cake Once the banana cake base is entirely cool to the touch, spread the thoroughly drained crushed pineapple in an even, flat layer over the surface. Next, pour the cream cheese and pudding mixture over the pineapple, using an offset spatula to push it gently to the edges of the pan.
Step 4: The Final Seal Finish the construction by spreading a thick, even layer of the thawed whipped topping completely over the pudding layer, sealing the dessert from edge to edge.
Step 5: The Crucial Chill Phase Cover the baking dish tightly with plastic wrap. Refrigerate the cake for at least 1–2 hours. (Pro-Tip: Letting it chill overnight yields the absolute best results!) The refrigeration process is an active cooking step here—it allows the starches to fully set and the flavors to marry. Cut into neat squares and serve chilled.
Expert Test-Kitchen Tips for Flawless Results
To ensure your layered dessert looks and tastes like a professional bakery creation, follow these strict execution rules:
- The Pineapple Drain: Do not rush draining your pineapple! Pour the can into a fine-mesh strainer suspended over a bowl and press down firmly with the back of a spoon to extract as much juice as possible. Excess juice will compromise the stability of your pudding layer.
- Temperature Management is Mandatory: You are working with ingredients that require opposing temperatures. The cream cheese must be fully softened at room temperature so it beats smoothly without leaving waxy lumps. Conversely, the milk used for the pudding must be ice cold to properly activate the modified starches in the mix.
- Wait for the Cool Down: If you attempt to layer the pineapple and pudding onto a cake that is even slightly warm, the heat will rise, melting the dairy layers and turning your beautifully structured cake into a soupy disaster. Exercise patience!
Creative Variations & Upgrades
This classic 9×13 format provides a fantastic canvas for your kitchen experiments. If you want to customize the flavor profile, try these test-kitchen approved swaps:
- The “Hummingbird” Twist: To mimic the famous Southern Hummingbird cake, sprinkle ½ cup of finely chopped, toasted pecans over the final layer of whipped topping before chilling.
- Strawberry Shortcake Variation: Swap the banana muffin mix for a standard yellow or white cake mix, and replace the crushed pineapple with a layer of fresh, macerated strawberries (well-drained).
- Tropical Coconut Upgrade: Fold ½ cup of toasted, shredded coconut directly into the cream cheese and pudding mixture for an added layer of texture and a deep, tropical flavor profile that pairs flawlessly with the banana and pineapple.