If you’re a fan of the classic Nestlé Crunch bar or crave that irresistible mix of smooth chocolate and crispy texture, you’re going to fall head over heels for Homemade Crunch Bars. These no-bake, melt-in-your-mouth delights are rich, crunchy, and incredibly easy to make — requiring just a handful of ingredients and minimal effort.
What Makes Homemade Crunch Bars So Good?
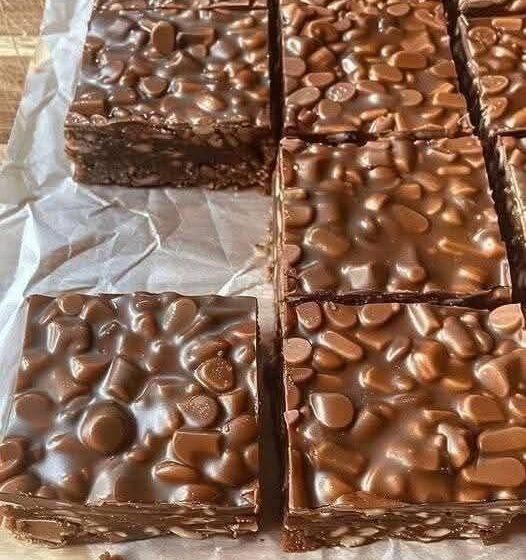
Homemade Crunch Bars strike the perfect balance between creamy and crispy. Each bite offers that satisfying snap of chocolate followed by the light, airy crunch of cereal or puffed rice. Unlike store-bought versions, homemade bars allow you to control sweetness, texture, and even the type of chocolate used. Plus, they make for a great make-ahead dessert or edible gift.
Ingredients You’ll Need
Here’s what you’ll need to make a batch of these chocolatey squares of joy:
- 2 cups milk chocolate chips (or a mix of milk and dark chocolate for depth)
- 1 cup semi-sweet chocolate chips
- 2 cups crispy rice cereal (like Rice Krispies)
- 2 tablespoons peanut butter (optional, for extra richness)
- ½ teaspoon vanilla extract (optional, but enhances flavor)
How to Make Homemade Crunch Bars
Prepare Your Pan:
Line an 8×8-inch or 9×9-inch baking pan with parchment paper, leaving some overhang to make removal easier later.
Melt the Chocolate:
In a large microwave-safe bowl, combine the milk chocolate chips, semi-sweet chips, and peanut butter (if using). Microwave in 30-second intervals, stirring each time, until smooth and glossy.
Add the Crunch:
Gently stir in the crispy rice cereal until all the pieces are well coated with the melted chocolate mixture. Be careful not to crush the cereal — you want to keep that light, airy crunch.
Spread and Smooth:
Pour the mixture into the prepared pan and spread it evenly using a spatula. Tap the pan gently on the counter to remove air bubbles and level the surface.
Chill to Set:
Refrigerate for about 1 to 2 hours, or until the bars are firm enough to cut cleanly.
Cut and Serve:
Lift the slab out of the pan using the parchment paper and cut into squares or bars. Store them in an airtight container in the refrigerator for up to 2 weeks (if they last that long!).
Optional Variations
- Add-ins: Stir in mini marshmallows, chopped nuts, or toffee bits for added flavor and texture.
- Dark chocolate lovers: Use all dark chocolate for a less sweet, more sophisticated version.
- Layered look: Add a drizzle of melted white chocolate on top for a fancy finish.
Why You’ll Love This Recipe
These homemade crunch bars check all the boxes — they’re quick, customizable, and crowd-pleasing. They’re perfect for lunchbox treats, holiday platters, or whenever you need a no-fuss dessert that everyone will rave about.
The best part? No oven, no fancy tools, and no stress. Just a few ingredients, a little stirring, and a whole lot of chocolatey crunch.