The BEST Butterfinger Balls (Easy No-Bake Dessert!)
If you absolutely love that unmistakable crispy, peanut-buttery crunch of a classic Butterfinger candy bar, you are going to fall completely head over heels for these incredible homemade Butterfinger Balls. Let’s be honest: when you are dedicating your week to strict meal prep, focusing on your weight loss goals, and eating a nutritious, high protein meal for every single quick dinner, you eventually need a reward! Maintaining a balanced diet doesn’t mean you have to give up chocolate forever; it just means finding the perfect, satisfying treats to enjoy in moderation.
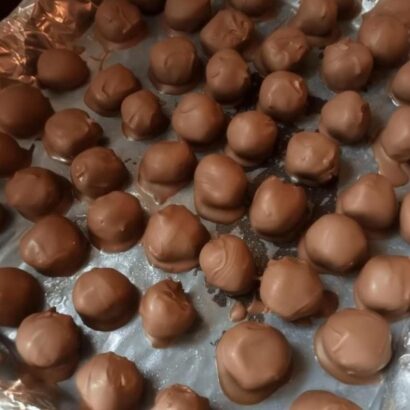
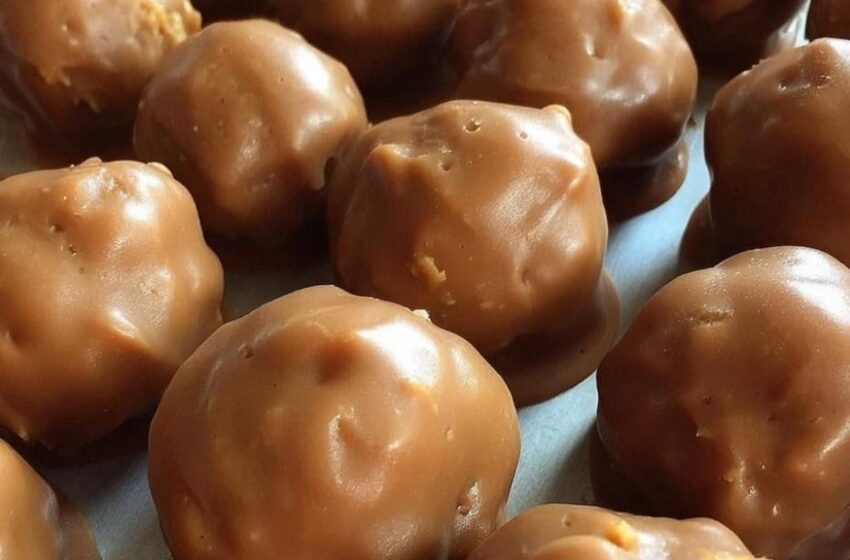
These bite-sized candies are sweet, creamy, crunchy, and coated in rich, velvety milk chocolate—basically everything you could possibly want in one bite-sized treat! The beauty of this easy recipe is that it requires absolutely zero baking time. You don’t have to heat up your kitchen or worry about complicated pastry techniques. With just a few simple, affordable ingredients from your local grocery store, you can recreate the iconic flavor of a beloved American candy bar right on your own kitchen counter.
Whether you are looking for a spectacular dessert to bring to a holiday party, a fun weekend cooking project to do with the kids, or just a little something sweet to keep in the fridge after a week of healthy eating, this recipe is guaranteed to be a massive hit. Grab your mixing bowl, and let’s dive into exactly how to make these irresistible, crunchy peanut butter truffles!
Why You’ll Love This Recipe
- The Ultimate Easy Recipe: With no oven required and minimal prep work, this is a foolproof dessert that anyone can master, regardless of their baking experience!
- A Texture Masterpiece: The combination of crunchy graham crackers, crispy candy pieces, and creamy peanut butter creates a mouthwatering texture that is completely out of this world.
- Perfect for Meal Prep: These chocolate-coated truffles store beautifully in the fridge or freezer, meaning you can make a large batch on Sunday to enjoy all month long.
- Family-Approved: Both kids and adults will go absolutely crazy for the nostalgic, comforting flavor of these bite-sized treats.
- Great for Gifting: Packed in a cute tin or a decorative box, these make a gorgeous, thoughtful homemade gift for teachers, neighbors, or friends during the holidays.
Ingredients
Here are the exact measurements you will need to create these crunchy, chocolatey, peanut-buttery masterpieces:
- 2 cups powdered sugar
- 3½ cups graham cracker crumbs
- 5 (1.9 oz) Butterfinger bars, crushed
- 1¼ cups melted butter
- 1½ cups crunchy peanut butter
- 2 (10 oz) bags Ghirardelli milk chocolate melting wafers
Garnish:
- 1 Butterfinger bar, crushed
Instructions / Method
- In a large bowl, mix together powdered sugar, graham cracker crumbs, crushed Butterfinger bars, melted butter, and peanut butter until fully combined.
- Using a tablespoon or small cookie scoop, roll the mixture into 1-inch balls. Place them on a parchment-lined baking sheet.
- Refrigerate for at least 30 minutes, or until firm. If needed, chill an additional 10 minutes.
- Melt the chocolate wafers according to package directions until smooth.
- Dip each ball completely into the melted chocolate, allowing excess to drip off.
- Place coated balls back onto the parchment-lined sheet.
- Before the chocolate sets, sprinkle crushed Butterfinger pieces on top.
- Let the chocolate harden completely before serving.
- Enjoy!
Is This Recipe Healthy?
When we talk about a truly healthy recipe lifestyle and sustainable weight loss, it is incredibly important to talk about mental health and food freedom! While a chocolate-covered candy truffle is obviously an indulgent dessert and not a vegetable, completely restricting yourself from the sweets you love is a guaranteed recipe for burnout and bingeing.
The secret to a successful balanced diet is portion control. Because these Butterfinger Balls are naturally portioned into small, 1-inch bites, it is incredibly easy to manage your intake! Enjoying one or two of these rich candies after a wholesome, high protein meal (like a lean turkey burger or grilled chicken salad) is the perfect way to satisfy your sweet tooth without derailing your daily calorie goals. By making your own treats at home, you are skipping the heavy artificial preservatives found in many commercial boxed candies. Treat your body well all week with healthy quick dinners, and reward your soul on the weekend with this glorious dessert!
Calories & Nutrition
Because this recipe yields a large batch of bite-sized truffles, they are wonderfully easy to track if you are monitoring your daily macros for fitness or health reasons!
On average, depending on the exact size you roll your dough, one homemade Butterfinger Ball contains approximately 140 to 170 calories. You are getting about 3g of protein from the crunchy peanut butter, and roughly 15g to 18g of sweet carbohydrates for a quick energy boost. They also provide about 9g to 11g of satisfying fats from the butter, peanut butter, and chocolate coating. When enjoyed mindfully alongside a lean diet, these classic candies fit beautifully into a well-rounded lifestyle!
Tips for Best Results
Want to make sure your candies look like they came straight from a gourmet chocolate shop and taste absolutely perfect? Follow these expert baker tips for flawless execution!
- Crush Consistently: When crushing your graham crackers and Butterfinger bars for the filling, try to get them as fine as possible. If the chunks are too large, the balls will crumble and fall apart when you try to roll them! A food processor works wonders for this.
- Chill Completely: Do not rush the resting process! The peanut butter balls must be very firm and completely chilled before you attempt to dip them. If they are too warm, they will melt into your hot chocolate and create a massive mess.
- Use Quality Chocolate: Ghirardelli melting wafers are highly recommended in this recipe because they melt beautifully and do not require tempering. If you substitute with standard chocolate chips, add a teaspoon of coconut oil or shortening to thin the chocolate out for easier dipping.
- The Toothpick Trick: To dip the balls without getting your fingers covered in chocolate, insert a toothpick into the top of the chilled ball, dip it completely, and place it on the parchment. Carefully twist the toothpick out, and use your crushed Butterfinger garnish to cover up the tiny hole!
Variations & Substitutions
This easy recipe is incredibly versatile! If you want to customize your homemade candies to fit your family’s exact tastes or dietary needs, try these fantastic variations:
- Dark Chocolate Swap: For a richer, slightly less sweet flavor profile, swap the milk chocolate wafers for high-quality dark chocolate wafers. The slight bitterness of the dark chocolate pairs beautifully with the sweet, sugary center!
- Gluten-Free Alternative: To make this recipe completely gluten-free, simply ensure your Butterfinger bars are certified gluten-free, and swap the traditional graham cracker crumbs for a certified gluten-free graham cracker alternative.
- Creamy Center: If you prefer a smoother texture without the extra peanut chunks, you can easily substitute the crunchy peanut butter for an equal amount of creamy peanut butter!
- White Chocolate Drizzle: Instead of garnishing with crushed candy bars, melt a small amount of white chocolate and use a fork to drizzle it beautifully over the top of the milk chocolate coating for an elegant, professional finish.
FAQ Section
Can I make this ahead of time? Absolutely! These truffles are the ultimate make-ahead meal prep dessert. You can make them several days in advance and keep them safely tucked away in the refrigerator until you are ready to serve them at your party or holiday gathering.
Is this recipe healthy? While it is an indulgent, sugary dessert, making treats from scratch allows you to practice portion control. Enjoying them in moderation perfectly complements a sustainable, balanced diet!
What is the best way to store it? Because the centers contain butter and peanut butter, these candies should be stored in the refrigerator to maintain their firm, crunchy texture. Place them in an airtight container with a sheet of parchment paper between any layers. They will stay fresh and delicious for up to 2 weeks!
Can I freeze it? Yes, these truffles freeze exceptionally well! Place the fully set, chocolate-coated candies in a freezer-safe container or heavy-duty freezer bag. They can be frozen for up to 3 months. You can eat them straight out of the freezer for a cool, crunchy treat, or let them thaw in the fridge before serving.
You May Also Like
If you loved the incredible ease, crunch, and nostalgic flavors of this no-bake recipe, you are going to want to add these other family-friendly favorites to your dessert rotation!
- Easy No-Bake Chocolate Peanut Butter Buckeyes
- Healthy High Protein Peanut Butter Energy Bites
- Quick Dinner: 15-Minute Edible Peanut Butter Cookie Dough
- The Best Classic Chocolate Fudge Recipe
- Low Carb Keto Peanut Butter Fat Bombs
- 3-Ingredient Chocolate Covered Pretzels
Final Thoughts
There is a profound sense of joy in creating a beloved, classic candy right in your own kitchen. These simple, nostalgic Butterfinger Balls prove that you do not need an oven or hours of complicated pastry techniques to produce a bakery-quality, mouthwatering treat! Whether you are making a batch to share at a neighborhood holiday potluck, gifting them to friends, or simply rewarding yourself after a long week of sticking to your healthy eating goals, this recipe is guaranteed to be a massive success. Relish the incredibly simple preparation, share the crunchy, peanut-buttery joy with your loved ones, and savor every single sweet bite!